

OK, I may have overstated it with the”beautiful jewelry” headline. But it’s no exaggeration when I say that this project is a lot of fun, and not just for kids. I think the outcome is pretty awesome, too. But somehow, having kids around makes it more acceptable.
The inspiration for this holiday gift project comes from ANC’s own Joanne Lobeski Snyder, retired teacher and lifelong artist. She’s a frequent contributor ANC’s Photo Cafe, and you might remember her pottery work featured during our recent auction.

It’s been many years since Joanne gave me this precious little gem of a lapel pin, something she made that never fails to be the subject of complements as people – OK, mainly woman – exclaim how much they love it. I love it, too. And I don’t usually disclose the secret behind this creation to just anyone. But I’ll tell you. (I think Joanne would be OK with it.)

This tiny wonder began as a plastic toy lizard. Once Joanne shared that information with me, I, of course, tried to replicate it. In truth, my lapel pin looked like a Dollar Tree lizard covered in nail polish and glitter, which was exactly what it was.
But it was also an ideal project for my grandchildren. My oldest grandchild first made these as holiday gifts when he was 3, and this year, now that he’s 8, his 5-year-old sister got to join in the fun.
It’s been many years since I participated in the crazy American tradition of over-the-top holiday shopping. I don’t set foot in the mall, unless it’s for See’s Butterscotch Lollipops, and most of the gifts I give are homemade and edible. However, I’m a big believer in instilling in children the idea of making holiday gifts, so they get in the habit of being good and gracious givers, not just receivers.
During the holidays I’ll share some of my favorite projects for children to make and give as gifts, starting with these lapel pins.
A word of caution about this particular project: It can be messy. If you can do it in a garage, or outside in a covered place that doesn’t have breezes, then that’s ideal. I started our project on the front porch, but then the wind kicked up and it was time to move the whole shebang indoors.
Yes, I’m still finding glitter in unlikely places – like one tiny piece stuck to my forehead yesterday, long after this project was cleaned up. But hey, consider it holiday sparkle. (Although I have one friend who stubbornly refers to glitter as the herpes of the craft world.)
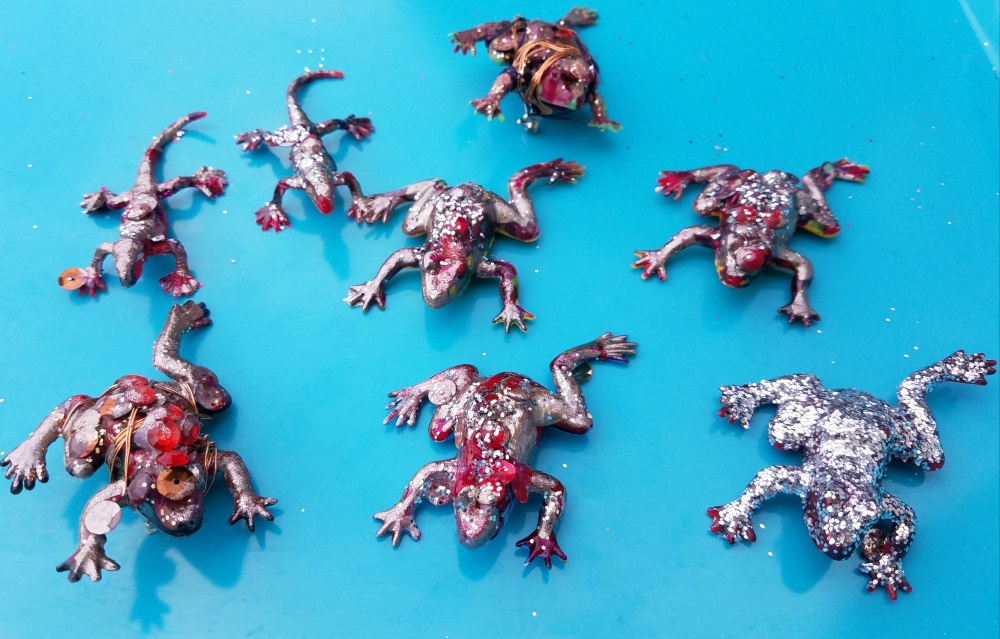
Select your plastic creatures, whether they’re bagged reptiles like the ones I bought at the Dollar Tree, or plastic dinosaurs, spiders or even snakes. My grandkids and I liked the lizards and frogs best.

I’m sure a “real” artist like Joanne probably uses oil or acrylic paints, but I like using Dollar Tree fingernail polishes, especially the gel kinds. They’re perfect, because they come in a variety of colors, and they each have their own little brushes. Make sure you do this project in a well-ventilated place, or your place will smell worse than a nail salon at prom week.
Gather your supplies: Paints (or nail polish), glitter, sequins and thin, colorful wire to wrap around the creature, but the wire is also nice for additional bling.

You can buy some inexpensive lapel pins from Michael’s, or any crafty store.

Then, divide up the creatures and let the magic begin.

Doni’s kitchen was a jewelry-making workshop for her grandkids and her youngest son, home for the holidays (p.s. Uncle Joe despises glitter).
The process is simple: One by one, paint the creatures, and then, while they’re still wet, apply glitter and sequins.

Next, put all the critters on a tray or piece of cardboard and take them outside to dry in a covered place. After they’re dry, apply coats of clear nail polish, varnish, Mod Podge or even white glue diluted with water. The point of this extremely crucial step is that it helps anchor the glitter so it’s covered, and won’t flake off on lapels for the rest of the recipient’s life.
When the creatures are dry, you can attach the pins to the critters’ undersides. I use just a dab of glue from a glue gun, and then helped the kids wrap around their selected wire, but you may decide to just use the wire to hold the pins in place.
By then, the mess is cleaned up, and the kids can begin the next step: deciding who they want to give each of their fantastic creations. Then they decorated small bags, upon which they wrote the recipients’ names, and, of course, the artists’ names, too, so there’s no mistaking who did what.

Because they have the same family members, they divvied up who would give which pins to whom; with the exception of their mother, who gets one from each child. (Kat, act surprised.)

After that, the bags are filled, and ready to give to female relatives. Uncle Joe is the lone male recipient, because the kids know that Uncle Joe MUST love those pins, because he made one (a silver-glitter disco frog) too.

In all seriousness, these little lapel pins are adorable, and the kids feel so proud of their creations.
Next week, pine cone bird feeders, and after that, forced bulbs. Nothing else with glitter. Feel free to share any of your favorite kid-friendly projects.
