


Although challah (pronounced “hallah”) is one of my favorite breads to bake, for tradition’s sake, I generally only make it during the holidays.
There’s so much to love about challah. For one thing, its dough is so silky soft and pliable, which makes it simple to form into gorgeous braids that bake into golden loaves.
More important, with challah’s slightly sweet, buttery flavor and light crumb texture, it’s fantastically delicious. Actually, it tastes a lot like the French brioche. In fact, the major difference between most brioche and challah recipes is that brioche has more butter but less sugar.
Because my husband is Jewish, I adopted my challah-making tradition early in our marriage. Even so, this was the first year Bruce actually helped roll the dough into the long ropes for the challah braids. It was a lot of fun. And it went faster with two of us.
The challah was perfect. If you’ve never tried it, challah is wonderful eaten plain, or warm, with butter, jam or honey. And if by some miracle you have some left over, it makes unforgettable French toast.
As an aside, since I bake bread a lot, I’ve found it makes more economical sense to buy large sacks of yeast and flour at places like Moore’s Flour Mill, or even Cash & Carry, both in Redding, than to buy tiny, relatively expensive packages of yeast and 5-pound sacks of flour.
But back to challah, an authentic Jewish bread that has rich symbolic and ceremonial roots.
It’s said that in the ancient Temple of Jerusalem, rabbis placed twelve loaves of challah on the tables; one to represent each Israelite tribe. In modern times, Jewish families often set two challah loaves for the Sabbath meal. This represents double portions of manna that fell from heaven on the sixth day, which allowed the Israelites to rest on the seventh day, instead of worrying about collecting food.
This concept of doubling the manna to leave one a day of rest really resonates with me.
As I may have mentioned a few hundred times, I’m a huge fan of doubling and even quadrupling recipes. It’s true I love to cook, but I love free time even more. My philosophy is that as long as I’m taking time to make something, I may as well increase the recipe so I can make extra and freeze the rest for later when time isn’t available.
My recipe below makes 8 nice loaves. If you don’t want that many, just halve the recipe.
By the way, a few weeks ago I taught my first challah-making class in my Igo kitchen. We had a blast. Also, as with all good classes, I learned something from the students. I learned that even though I’d always used my KitchenAid to mix bread dough, a big bowl and a wooden spoon works just fine. I discovered this by accident after I realized that none of the students owned a standing mixer.
How dumb would it be to teach a cooking technique that required tools students lacked? (OK, I make the exception with pasta classes. I teach the classes in hopes students will fall in love with the flavor of fresh pasta and will buy a pasta machine.)
So the challah students mixed their dough by hand in large bowls with wooden spoons. It worked so terrific that I didn’t use my mixer to make challah a few days ago. It offered more room than my 5-quart standing mixer. (Yes, I dream of owning a huge, commercial Hobart mixer. But to quote my husband, people in hell want ice water, too.)
Whenever I’ve doubled recipes in my KitchenAid, I’ve faced a constant battle to prevent the over-abundance of dough from creeping up the paddle and into the motor. When I made the challah by hand, doubling the recipe was easy. The bowl’s size was my only limit. (Use a stock pot if you don’t have a big enough bowl. ) Here’s a tip, put a wet paper towel beneath the bowl to keep it from slipping all over.
Whether you make challah in a standing mixer or by hand; whether you make it now or wait until next December, I wish you all happy challah days, and many, many days of rest.
 [print]
Doni’s Challah for a Crowd
4 cups milk 1 1/2 sticks of butter 2/3 cup sugar 3 tablespoons active dry yeast 6 eggs, beaten 3 1/2 teaspoons salt 12 cups flour (bread flour works best)Put milk, butter and sugar in a microwavable bowl and heat for 2 minutes. Remove and stir well to dissolve the sugar. Return the bowl to the microwave and bring the contents to a boil. (Or, bring everything to boil on your stovetop.)
Stir the mixture and then pour the mixture into a large mixing bowl. Let cool to about 110 degrees.
Add the yeast and whisk well. (It will appear slightly lumpy. Don’t freak.) Let it sit about 10 minutes, or until the yeasty-milk mixture looks foamy and bubbly. Now add the eggs and salt to the milky-yeast mixture and stir well.
Using a heavy wood spoon, stir in the flour, a few cups at a time, until the dough is sticky.
Generously flour your work surface, then pour the sticky dough onto it. Add more flour on top of the dough, so you can start to fold it and knead it without getting your fingers stuck in the dough. (Try using the karate-chop part of your hand, and avoid pushing your fingers deep into the dough during this sticky phase.)
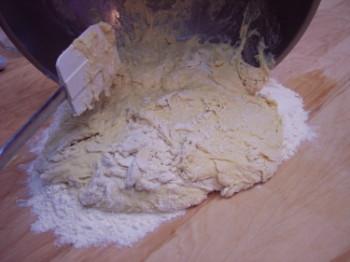
The goal is to keep adding just enough flour to make the flour not stick to your work surface and your hands. However, don’t add so much flour that the dough becomes stiff or difficult to work with. Think Flubber, or a lava-lamp look.
Knead the dough. Turn it, fold it, push it, turn it, fold it, push it. Repeat those methodical steps until your dough is soft and supple. Flour your work surface as needed.
Use hot water to wash the bowl in which the dough was made. (I don’t advocate using soap to wash the dough bowl at this point; too great a risk of having the dough taste soapy. Dry the bowl well. Smear butter inside the bowl.)
Place your dough in the bowl and rub it around in the bowl to mop up some butter. Then flop the dough over, so the dough now has butter on its top and bottom.
Cover the dough with a towel (so a crust doesn’t form, which might curb its rising potential).
Set the bowl in a dry, warm place (like an oven that was turned on recently and then turned off). Let the dough rise for about 1 to 2 hours, or until your dough is about double its former size. (Sometimes I’ll use my finger to draw a line in the butter inside the bowl in anticipation of where double might be. Then, as the dough rises and approaches that line, I know it’s almost ready.)
Punch down the dough. (It’s fun.)
Knead the dough enough to form it into an informal rectangle. Cut the dough into 8 equal pieces.
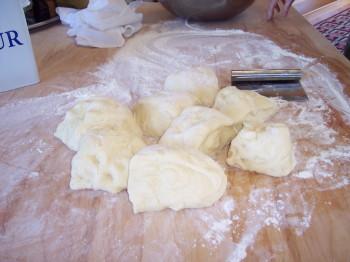
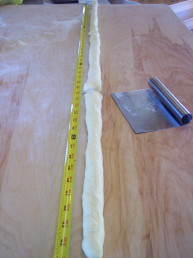
Roll each section into about a 45-inch-long rope. (Of course, if you want shorter, fatter loaves, make the rope shorter. If you want longer, thinner loaves, make the rope even longer.) Now cut the rope into thirds.
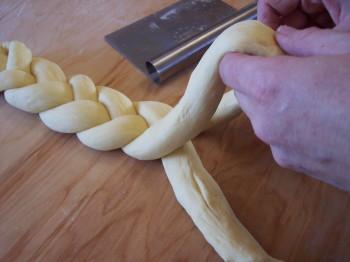
Pinch the three pieces together at one end, and braid. (It’s easier if you braid with the lengths pointing toward you, instead of trying to braid sideways. Anyone who’s ever braided hair will have the advantage here.) At the end of the braid, pinch the ends tightly and tuck under slightly.
Set loaves on parchment-paper covered baking pans, leaving room between the loaves so they can spread out. Cover with the same towels and let rise again, but this time only about 1 hour, until the loaves aren’t quite double in size. (They’ll rise more during baking.)
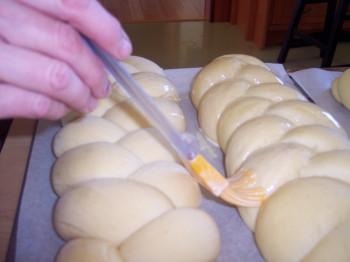
Brush with an egg wash (2 beaten eggs and 3 tablespoons of water).
Bake on the middle rack of a pre-heated 350-degree oven for about 30 to 35 minutes, or until the loaves are golden brown and sound slightly hollow when thumped.
Makes 8 loaves.
[/print]
